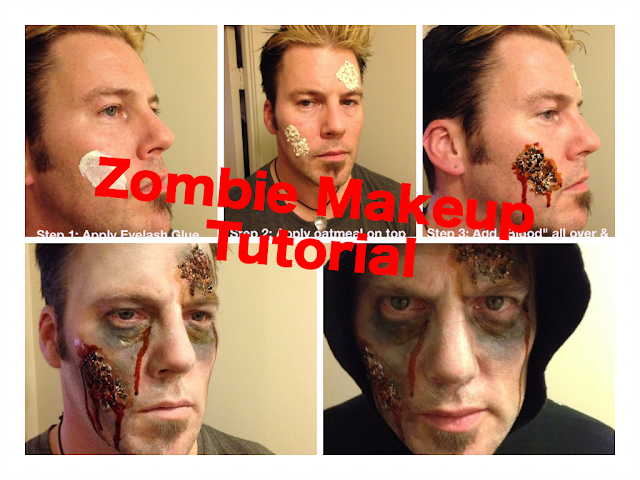
Last Minute Halloween Idea: 4-Step "Bloody Zombie Makeup" Using OATMEAL & GLUE!
Halloween is only two days away! If you're looking for a quick, last minute costume / makeup idea, try on the "Bloody Zombie" look for size!
I wanted to try to do a super simple and quick look, using "ingredients" that most people already have at home. You won't have to run out to a Halloween supply outlet, and anything you don't already have in your cabinets can be found at your local grocery or drugstore!
I gave myself FIVE minutes to pull together this look, from start to finish (and that included taking the photos). Special thanks to Justin, who volunteered to be my "model" / guinea pig and turn him into the undead.
Below I have included a tutorial / instructions. Nothing below is written in stone- the great thing about this look is that the only items you *really* need to stick by the books for is the oatmeal and glue for the wounds. You can use almost anything to get the blood color.
You Will Need:
For the ROTTEN FLESH WOUNDS / SCABS
- Oatmeal (Used for those nasty, flakey woulds!)
- False Eyelash Glue (or any other type of glue that dries tacky) to glue on the oatmeal. Eyelash glue can be found at almost any store that sells cosmetics (ex: CVS/Walgreens/Walmart/Target) and many Dollar Stores. This is relatively inexpensive, and should only cost a few bucks.
For the BLOOD / COLORING of the wounds / scabs
- Red Food Coloring
- Any type of syrup, such as Karo Syrup (which is corn syrup) to use as your base to mix the food coloring into. You can also swap this out for something like vegetable or olive oil. Play around with it and see what works best.
OPTIONAL:
Colored Eye Shadow, Red Lipstick, etc- Used to further fill in the wounds, create bruises, etc.
"Bloody Zombie" MAKEUP TUTORIAL
PREP your blood. In a cup or small bowl, mix together the syrup with red food coloring. The more dye you add to the syrup, the darker it will be. I made two bowls: one lighter red to look like "fresh" blood, and one darker to look like "old" blood.
STEP ONE: Wash & dry face so you have a clean "canvas". Decide where on your face you want to place your wounds. Apply patches of eyelash glue onto these location. Note: Make sure you do the steps individually for each wound and repeat (so the glue doesn't dry while working on other patches).
STEP TWO: Apply oatmeal over the glue. I find the easiest way to do this is stand over the sink, pour a good amount of oatmeal into your palm, and just push it onto your face. You'll have some spillage/ extra, but applying each piece of oatmeal individually would obviously not work and be incredibly time consuming. Allow to dry for several minutes.
STEP THREE: Begin filling in and coloring the wounds using whatever you desire. Here is how I did it:
- Using a makeup brush (or paint brush), liberally apply "blood" over oatmeal.
- After letting it dry for two minutes, I used eyeshadow around and on top of the wounds. I wanted it to look bruised around the edges, so I used shades of purple, blue, green and yellow eyeshadow. There isn't an art to this, all I did was layer the colors and blend them together with a brush.
OPTIONAL:
After doing the wounds, I smudged his face with white eyeshadow to give a paler look. I also used some black and gray shadow to give the appearance of bags under the eyes, and sunken cheekbones. Play around all you like- the great thing about this makeup is that it's really hard to mess up- most anything you do will look cool and add to the creepy factor!
Finished Product:


